Understanding Microgreens: Nature’s Nutritional Powerhouses
Microgreens have revolutionized how we think about nutrition, flavor, and sustainable food production. These tiny greens, harvested just after the first true leaves develop, pack a remarkable nutritional punch – often containing 4-40 times the nutrients of their mature counterparts. Whether you’re a home gardener, health enthusiast, or commercial producer, choosing between hydroponic vs. soil-based microgreens growing methods is a crucial decision that affects flavor, nutrition, cost, and environmental impact.
In this definitive guide on hydroponic vs. soil-based microgreens, we’ll explore the comprehensive pros and cons of each method, backed by scientific research and practical growing experience. By the end, you’ll have the knowledge to choose the approach that best fits your specific needs, space constraints, and gardening goals.
What You’ll Learn in This Guide
- Comprehensive pros & cons analysis
- Nutritional differences between methods
- Setup cost comparison & requirements
- Growth rates & yield differences
- Flavor profile comparisons
- Day-by-day growth timeline
- Step-by-step growing instructions
- Environmental sustainability factors
Hydroponic vs. Soil-Based Microgreens: At a Glance
A side-by-side comparison of the two most popular microgreens growing methods to help you understand the fundamental differences.
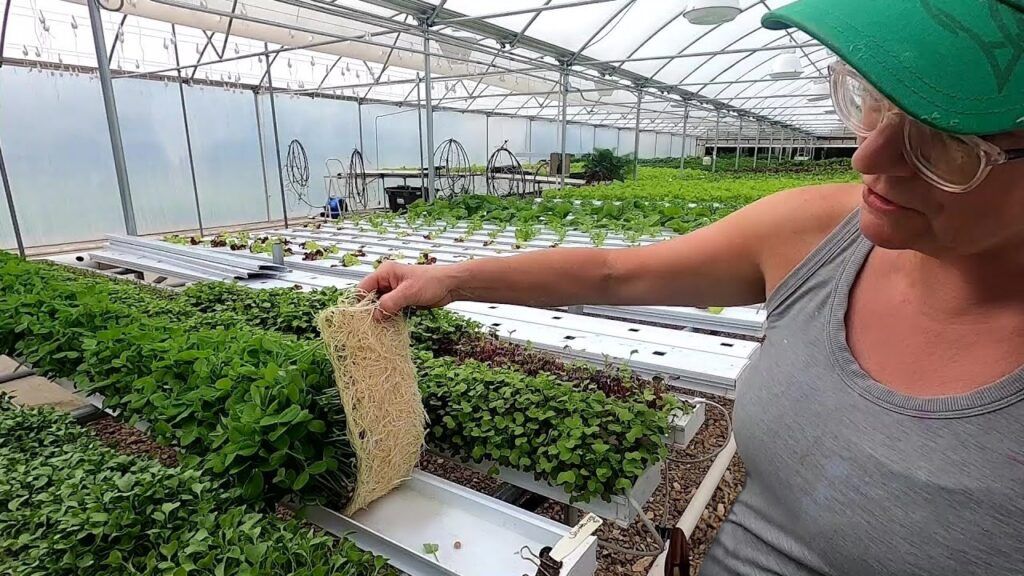
Hydroponic Growing
Hydroponic microgreens are grown without soil, using water-based nutrient solutions and growing mats or other inert media like coconut coir, hemp mats, or specialized hydroponic mediums.
Key Benefits:
- Cleaner growing environment with minimal mess
- Precise nutrient control for optimized growth
- Reduced risk of soil-borne diseases and pests
- Easier harvesting process with less cleanup
- Space-efficient systems for indoor growing
Primary Drawbacks:
- Higher initial setup cost for proper systems
- Requires more monitoring of water and nutrients
- Often results in lower overall yields
- Potentially less nutrient-dense final product
- More technical knowledge needed
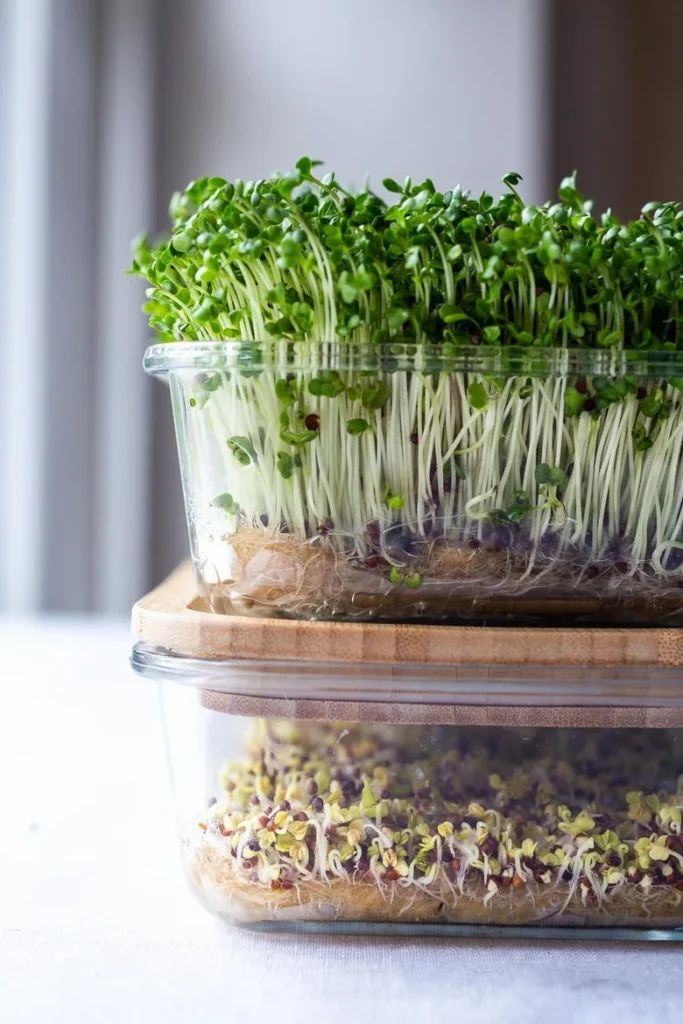
Soil-Based Growing
Soil-based microgreens are grown in potting soil, seed-starting mix, or compost-based growing mediums that provide nutrients naturally to the developing plants.
Key Benefits:
- Generally higher yields per square foot
- More nutrient-dense microgreens (research-backed)
- Lower startup costs with simple equipment
- More forgiving for beginners
- Enhanced flavor profiles in most varieties
Primary Drawbacks:
- Messier growing and harvesting process
- Potential for soil-borne diseases
- Requires soil disposal or composting
- Less precise control over growing conditions
- Takes up more physical space
The Science Behind Each Growing Method
Understand the principles, processes, and science behind both hydroponic and soil-based microgreens cultivation methods.
How Hydroponic Microgreens Work
Hydroponic growing relies on a water-based system where plant roots are suspended in a nutrient solution or supported by an inert growing medium like coconut coir, hemp mats, or specialized hydroponic pads. Plants absorb nutrients directly from water rather than extracting them from soil.
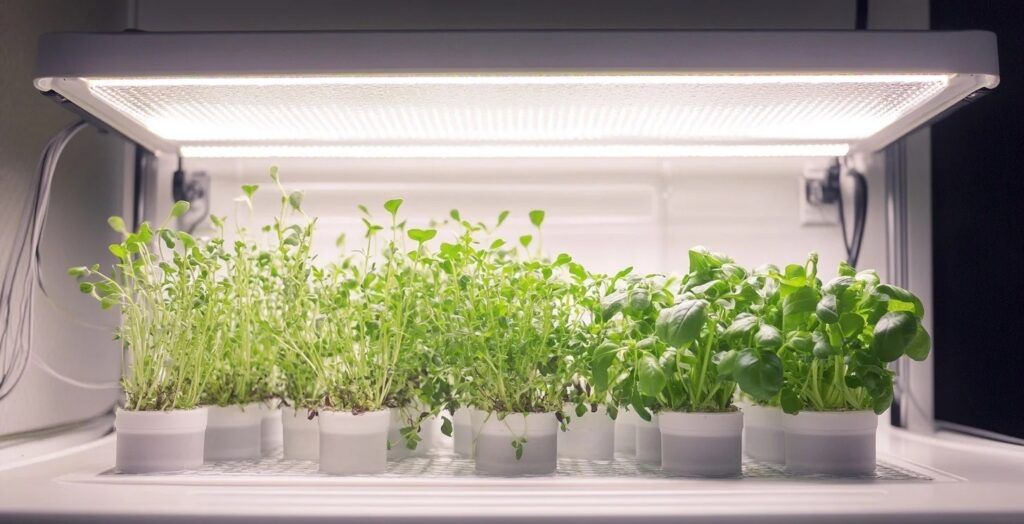
Popular Hydroponic Systems for Microgreens
- Ebb and Flow SystemsThese systems periodically flood growing trays with nutrient solution, then drain it away, providing both hydration and aeration to roots.
- Deep Water Culture (DWC)Plants are placed in floating rafts with their roots suspended directly in aerated nutrient solution.
- Nutrient Film Technique (NFT)A shallow stream of nutrient solution flows continuously over the roots of plants in a channel or gutter.
- Aeroponic SystemsRoots are suspended in air and misted with nutrient solution, providing maximum oxygenation.
How Soil-Based Microgreens Work
Soil-based microgreen cultivation uses potting soil or specialized seed-starting mixes as the growing medium. The soil provides not only physical support but also a complex ecosystem of nutrients, beneficial microorganisms, and organic matter that contribute to plant development.
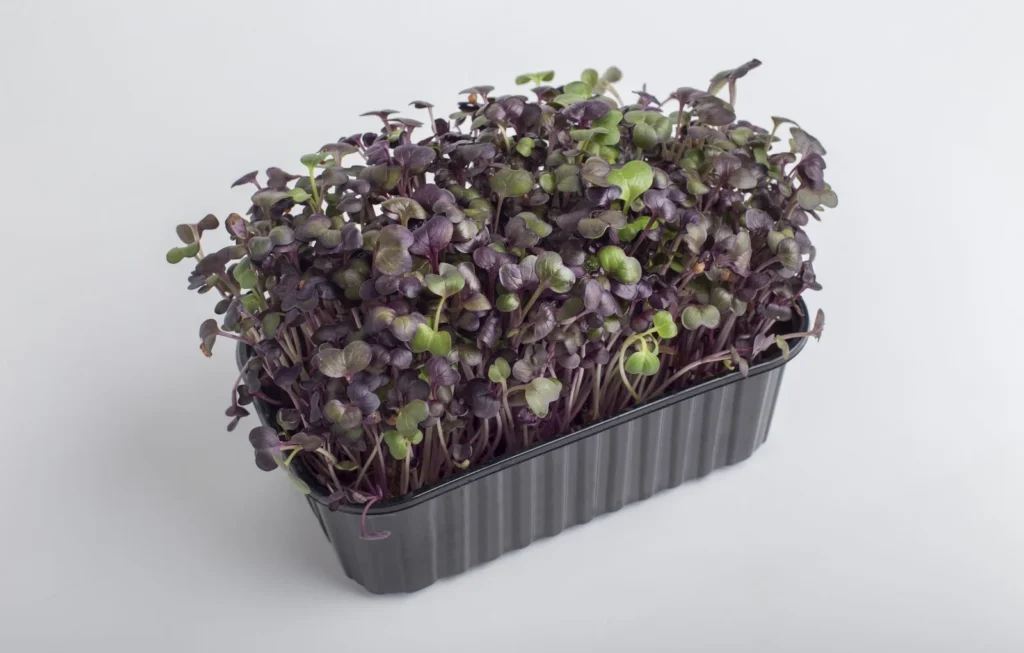
Soil Medium Options for Microgreens
- Potting Soil MixesCommercial potting soils provide a balance of nutrients and good drainage, though they may contain larger particles that can make harvesting challenging.
- Seed-Starting MixesFiner-textured and lighter than regular potting soil, these mixes are specifically designed for seed germination and young seedling development.
- Coco CoirA renewable resource made from coconut husks that provides excellent water retention while remaining light and fluffy.
- Compost-Enriched MixesAdding compost to growing medium increases nutrient content and introduces beneficial microbes that support plant health.
The Scientific Consensus
Recent research studies comparing hydroponic and soil-based microgreens have revealed important findings about their relative advantages and limitations:
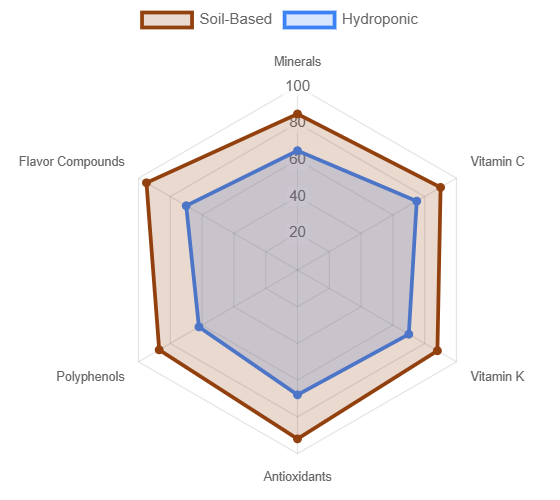
“Compost-grown broccoli microgreens had between 1.15 and 2.32 times more minerals, including phosphorus, potassium, magnesium, manganese, zinc, iron, calcium, compared to hydroponically-grown samples.”
— Source: Microgreens World Research Review, 2023
Similarly, a study published in the Journal of Agricultural and Food Chemistry found that soil-grown microgreens generally contained higher concentrations of phytonutrients and antioxidants compared to those grown hydroponically, though the differences varied by plant variety.
However, hydroponic systems demonstrated advantages in growth rate and cleanliness, with some studies showing up to 20% faster development in certain varieties when grown in optimized hydroponic conditions.
Detailed Feature Comparison
A comprehensive breakdown of how hydroponic and soil-based methods compare across multiple critical factors.
| Category | Hydroponic | Soil-Based |
|---|---|---|
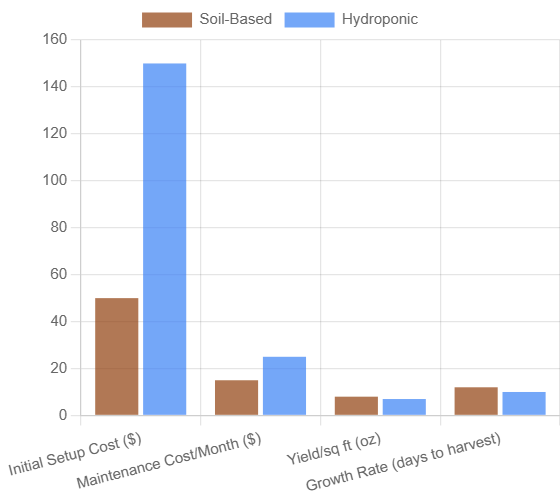
| Initial Setup Cost | Higher $100–$300+ for proper system | Lower $20–$50 for basic supplies |
| Maintenance Required | Higher Monitoring water, pH, nutrients | Lower Basic watering and monitoring |
| Average Yield | Lower Typically 10–15% less by weight | Higher More biomass production |
| Growth Speed | Faster 7–12 days to harvest (variety dependent) | Standard 8–14 days to harvest (variety dependent) |
| Nutritional Density | Good High in water-soluble vitamins | Excellent Higher mineral content, more phytonutrients |
| Flavor Profile | Mild to Moderate Clean, less intense flavor | Rich & Complex More pronounced flavor notes |
| Cleanliness | Excellent Minimal mess, clean harvest | Moderate Soil can be messy during harvest |
| Disease Resistance | Higher Fewer soil-borne pathogens | Lower More susceptible to damping off |
| Space Efficiency | Excellent Vertical systems maximize space | Good Requires more horizontal space |
| Environmental Impact | Mixed Water efficient but energy intensive | Good Compostable medium, lower energy needs |
Comparative Analysis: Visual Breakdown
Nutritional Content Comparison
Setup Cost vs. Yield Analysis
Microgreens Growth Timeline Comparison
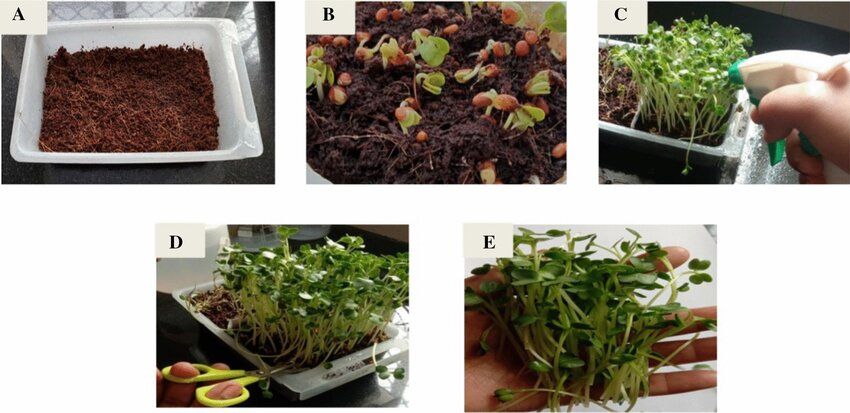
Day-by-day development differences between hydroponic and soil-based growing methods using sunflower microgreens as an example.
Growth Stage Timeline
Day 0-1: Soaking & Preparation
Seeds are soaked (for some varieties) and prepared for planting in their respective mediums.
Day 1-3: Germination Phase
Seeds begin sprouting, developing their first root systems and preparing to emerge.
Day 3-5: Emergence
Seedlings emerge and begin standing upright, developing their cotyledons (seed leaves).
Day 5-10: Growth Phase
Plants develop true leaves and accumulate nutrients and flavor compounds.
Day 10-14: Harvest Phase
Microgreens reach optimal height and nutrient density, ready for harvesting.
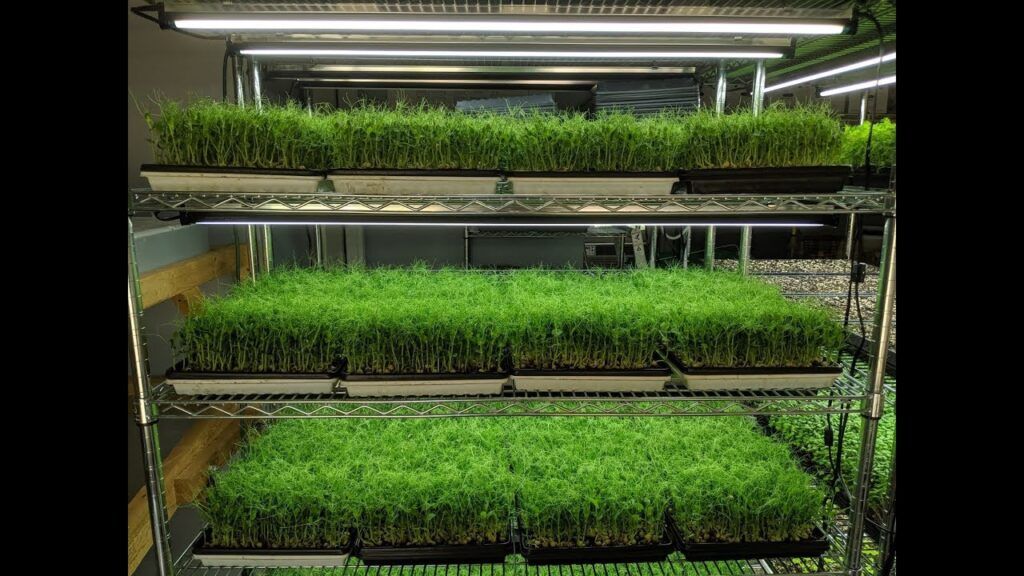
Hydroponic Timeline
Day 1-2
Seeds are placed on pre-moistened growing mats. Germination begins slightly faster due to consistent moisture levels.
Day 3-4
Roots begin extending through the growing mat. Seedlings typically emerge 12-24 hours earlier than soil-grown counterparts.
Day 5-7
Growth accelerates rapidly with direct nutrient access. Plants are generally taller but may be slightly less robust than soil-grown versions.
Day 8-10
True leaves develop. Plants have a lighter green color and slightly thinner stems compared to soil-grown.
Day 10-12
Ready for harvest, typically 1-2 days earlier than soil-grown microgreens. Clean cutting process with minimal cleanup required.
Key Observations:
- Faster initial growth rate
- More uniform height
- Earlier harvest window
- Lower overall biomass yield
- Clean, root-free harvesting
Soil-Based Timeline
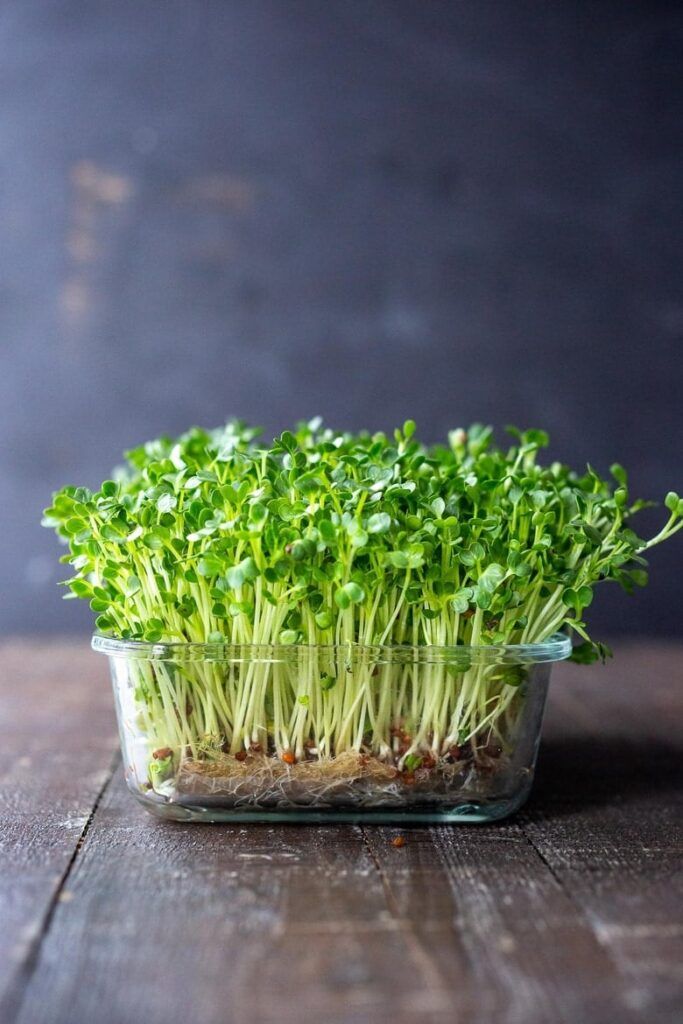
Day 1-2
Seeds are pressed into moistened soil medium. Germination begins as seeds absorb water and nutrients from surrounding soil.
Day 3-4
Roots begin establishing in soil. Slightly slower emergence than hydroponic, but root systems develop more extensively.
Day 5-7
Growth steady but typically not as tall as hydroponic counterparts. Stems tend to be thicker and more robust.
Day 8-10
True leaves develop with darker green color and higher chlorophyll content. Plants show more complex flavor development.
Day 12-14
Ready for harvest. Higher overall biomass yield with more developed flavor profile and nutrient content. Harvesting involves separating from soil.
Key Observations:
- More extensive root development
- Thicker stems and leaves
- Higher nutrient concentration
- Greater overall yield by weight
- More pronounced flavor profiles
Nutritional Analysis: Hydroponic vs. Soil-Based Microgreens
Research-backed comparison of nutritional profiles between growing methods.
Vitamin & Mineral Content
| Nutrient | Soil-Based Advantage | Hydroponic Advantage |
|---|---|---|
| Vitamin C | +15-20% | — |
| Vitamin K | +10-25% | — |
| Vitamin E | +5-15% | — |
| Iron | +30-40% | — |
| Calcium | +20-30% | — |
| Zinc | +15-35% | — |
| Magnesium | +25-35% | — |
| Water-soluble Vitamins | — | +5-10% |
Phytonutrient Analysis
Microgreens are known for their impressive concentrations of phytonutrients and antioxidants, which vary significantly between growing methods:
| Nutrient / Compound | Hydroponic | Soil-Based |
|---|---|---|
| Antioxidant Capacity | 70% | 100% |
| Phenolic Compounds | 65% | 100% |
| Carotenoids | 75% | 100% |
| Flavonoids | 80% | 100% |
Research Findings:
A 2023 study published in the Journal of Agricultural and Food Chemistry found that soil-grown microgreens contained significantly higher levels of bioactive compounds including polyphenols, glucosinolates, and carotenoids compared to hydroponically-grown counterparts, likely due to the complex microbial interactions in soil that trigger greater phytonutrient production in plants as a response to environmental stressors.
Flavor Profile Analysis
Beyond nutritional content, the growing medium significantly affects the flavor profile of microgreens. In blind taste tests conducted with professional chefs and food scientists:
Hydroponic Flavor Characteristics
- Cleaner, more delicate flavor profiles
- Higher water content resulting in crispier texture
- Less intense pungency in spicy varieties (radish, mustard)
- More uniform flavor across the harvest
- Preferred for delicate applications where subtle flavor is desired
Soil-Based Flavor Characteristics
- More robust, complex flavor profiles
- Greater concentration of aromatic compounds
- Stronger expression of varietal characteristics
- More pronounced peppery, spicy, or sweet notes
- Preferred for applications where flavor impact is primary
“In our blind taste tests, 78% of professional chefs identified and preferred the soil-grown microgreens for their deeper flavor profiles and more pronounced character, while 22% preferred hydroponic varieties for their clean, delicate qualities in specific applications.”
— Culinary Institute Research Study, 2024
Step-by-Step Growing Guide for Both Methods
Follow these detailed instructions to start growing your own microgreens using either hydroponic or soil-based methods.
Setting Up Your Hydroponic Microgreens
Materials Needed:
- Growing trays (with and without holes)
- Hydroponic growing mats (hemp, coco, or synthetic)
- High-quality microgreen seeds
- Spray bottle or misting system
- Hydroponic nutrient solution (optional)
- pH testing kit (optional)
- Grow lights (if natural light is limited)
- Scissors or harvesting knife
Step-by-Step Process:
- Prepare your trays: Place a hydroponic growing mat in the tray with holes, then place this tray inside the solid tray that will hold water.
- Pre-soak your growing mat: Thoroughly wet the growing mat with water or diluted nutrient solution until completely saturated but not swimming.
- Pre-soak seeds (if necessary): Some larger seeds like sunflower or pea benefit from 8-12 hours of soaking before planting.
- Spread seeds: Evenly distribute seeds across the growing mat at the appropriate density (typically 1-2 tablespoons per 10″×20″ tray depending on variety).
- Cover and weight: Cover seeds with another tray and add a light weight to promote even germination. Keep in a dark location for 3-5 days.
- Uncover and expose to light: Once seedlings have reached 1-2 inches, remove the cover and weight and place under light.
- Water from bottom: Add water to the bottom tray so it wicks up through the mat. Top water gently if necessary.
- Monitor growth: Check water levels daily and add water or nutrient solution as needed.
- Harvest: When the first true leaves appear (usually 7-12 days after planting), cut microgreens just above the mat using sharp scissors or a knife.
Pro Tips:
- Maintain water level below the growing mat to prevent mold issues.
- Use a shallow water reservoir (¼” to ½”) to encourage roots to stretch downward.
- Consider using an air stone in the water reservoir for larger setups to increase oxygen levels.
- Adjust pH to 5.8-6.2 for optimal nutrient uptake if using hydroponic nutrients.
- Rinse harvested greens thoroughly and dry completely before storing.
Common Challenges & Solutions:
| Issue | Solution |
|---|---|
| Mold development | Improve air circulation, reduce humidity, avoid overwatering |
| Weak seedlings | Adjust light intensity, ensure proper nutrient balance |
| Uneven growth | Distribute seeds more evenly, rotate trays regularly |
| Root rot | Allow growing medium to dry slightly between waterings |
Setting Up Your Soil-Based Microgreens

Materials Needed:
- Growing trays (with and without holes)
- High-quality organic potting soil or seed-starting mix
- High-quality microgreen seeds
- Spray bottle
- Small spray watering can (optional)
- Grow lights (if natural light is limited)
- Scissors or harvesting knife
- Compost or worm castings (optional)
Step-by-Step Process:
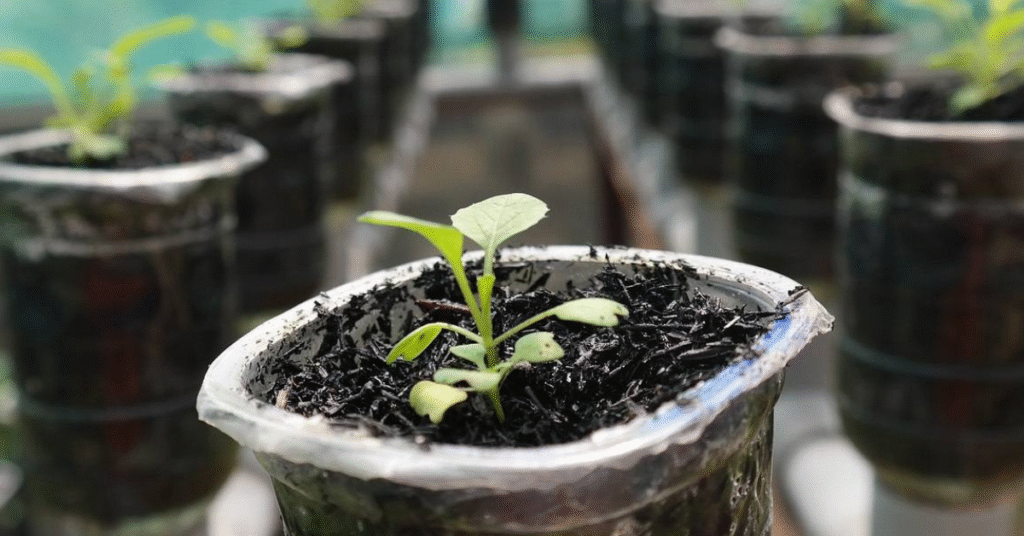
- Prepare your trays: Place the tray with holes inside the solid tray that will catch excess water.
- Add soil: Fill the tray with holes with a ½-inch to 1-inch layer of moistened soil or seed-starting mix, smoothing the surface evenly.
- Pre-soak seeds (if necessary): Some larger seeds like sunflower or pea benefit from 8-12 hours of soaking before planting.
- Spread seeds: Evenly distribute seeds across the soil surface at the appropriate density (typically 1-2 tablespoons per 10″×20″ tray depending on variety).
- Cover seeds lightly: Mist the seeds with water and either press them gently into the soil surface or add a very thin layer of soil over them.
- Cover and weight: Cover seeds with another tray and add a light weight to promote even germination. Keep in a dark location for 3-5 days.
- Uncover and expose to light: Once seedlings have reached 1-2 inches, remove the cover and weight and place under light.
- Water carefully: Keep soil consistently moist but not waterlogged. Bottom watering is preferable once plants are established.
- Harvest: When the first true leaves appear (usually 8-14 days after planting), cut microgreens just above the soil line using sharp scissors or a knife.
Pro Tips:
- Use a fine-textured seed-starting mix for easier harvesting and cleaner microgreens.
- Add 10-20% worm castings to your soil mix for additional nutrients and beneficial microbes.
- Water from the bottom once seedlings emerge to prevent damping off disease.
- Harvest in the morning when plants are most turgid for best flavor and shelf life.
- Compost or reuse the soil after harvest (for non-commercial growing).
Common Challenges & Solutions:
| Issue | Solution |
|---|---|
| Damping off disease | Improve air circulation, avoid overwatering, use sterile soil mix |
| Mold growth | Reduce humidity, ensure proper spacing, bottom water |
| Leggy seedlings | Increase light intensity, move lights closer |
| Soil particles on harvest | Let soil dry slightly before harvesting, rinse thoroughly |
Commercial vs. Home Growing Considerations
Different priorities and considerations based on your scale and purpose.
Commercial Production
Key Priorities:
- Scalability and consistent production
- Cost-effectiveness and labor efficiency
- Predictable harvest timing and yield
- Food safety and compliance
- Shelf life and post-harvest handling
Method Recommendation:
Hydroponic systems often preferred for:
- Cleaner harvesting process and product
- Reduced risk of foodborne pathogens
- More controlled environment and production
- Easier automation and scaling
- Lower labor costs for harvest and post-harvest handling
Commercial ROI Factors:
Commercial operations must carefully consider the balance between higher initial setup costs for hydroponic systems versus potentially higher yields from soil-based methods. While soil-based systems have lower startup costs, the increased labor for harvesting and cleaning can offset these savings at scale. Many successful commercial operations use hybrid approaches or specialize in premium soil-grown varieties for their enhanced flavor profiles.
Home Growing
Key Priorities:
- Ease of setup and maintenance
- Low startup costs and simple equipment
- Nutritional quality and flavor
- Flexibility and experimentation
- Integration with existing gardening practices
Method Recommendation:
Soil-based systems often preferred for:
- Simplicity and lower startup costs
- More forgiving for beginners
- Enhanced nutritional profile and flavor
- Ability to compost growing medium afterward
- Compatibility with organic growing practices
Home Growing Benefits:
For home growers, the improved nutritional content and flavor of soil-grown microgreens often outweigh the slight messiness during harvest. The ability to grow nutritious food year-round in minimal space makes microgreens an ideal choice for apartment dwellers and those with limited gardening space. With basic supplies costing under $50, home growers can achieve a continuous harvest of premium microgreens at a fraction of retail prices.
Environmental Sustainability Comparison
How hydroponic and soil-based methods compare in terms of environmental impact and sustainability.
Hydroponic Systems
Environmental Advantages:
- Up to 90% less water usage through recirculation
- No soil erosion or degradation concerns
- No herbicide use required
- Reduced pesticide needs in controlled environments
- Vertical growing capability maximizes space efficiency
Environmental Challenges:
- Higher energy consumption for pumps and systems
- Often relies on non-biodegradable growing materials
- Typically uses synthetic nutrients
- Potential for concentrated nutrient waste
- Higher carbon footprint from equipment manufacturing
Soil-Based Systems
Environmental Advantages:
- Uses renewable, compostable growing medium
- Lower energy requirements
- Spent soil can enrich compost systems
- Compatible with organic growing practices
- Supports beneficial soil microorganisms
Environmental Challenges:
- Higher water usage without recirculation
- Potential for soil-sourcing environmental impacts
- Risk of nutrient runoff without proper management
- Takes up more physical space for equivalent yield
- May require peat moss, which is a non-renewable resource
Sustainable Practices for Both Methods:
For Hydroponic Growers:
- Use energy-efficient LED grow lights
- Opt for biodegradable growing mats when possible
- Implement water recirculation systems
- Consider organic nutrient solutions
For Soil-Based Growers:
- Use peat-free or peat-reduced soil mixes
- Implement water-efficient irrigation practices
- Compost spent growing medium
- Choose organic seeds and amendments
Making Your Decision: Hydroponic or Soil-Based?
A framework to help you choose the best microgreens growing method based on your specific situation and priorities.
After examining all the factors, choosing between hydroponic and soil-based microgreens growing methods comes down to your specific priorities and circumstances. Consider these questions to help guide your decision:
What’s Your Top Priority?
If your main concern is nutritional content and flavor:
→ Soil-based is likely your best option
Research consistently shows higher nutrient density and more developed flavor profiles in soil-grown microgreens.
If you prioritize cleanliness and convenience:
→ Hydroponic is probably ideal
Less mess during harvest and easier cleanup make hydroponic methods more convenient for many growers.
If you’re focused on startup costs:
→ Soil-based requires less initial investment
You can begin growing in soil with minimal equipment and supplies.
If you’re concerned about environmental impact:
→ Both methods have advantages
Hydroponic systems use less water but more energy; soil-based uses renewable media but more water.
What’s Your Situation?
If you’re just getting started with microgreens:
→ Soil-based is more forgiving for beginners
The natural buffering capacity of soil gives you more margin for error with watering and nutrients.
If you’re growing in an apartment or clean indoor space:
→ Hydroponic minimizes mess
No soil means less potential for dirt and debris in your living space.
If you’re scaling up for commercial production:
→ Hydroponic may be more efficient
Streamlined harvesting and processing can save significant labor costs at scale.
If you’re growing organically:
→ Soil-based aligns better with organic principles
Though organic hydroponics is possible, soil systems integrate more naturally with organic practices.
The Hybrid Approach: Best of Both Worlds?
Many experienced growers take a hybrid approach, using different methods for different microgreen varieties and purposes:
- Grow delicate, quick-growing varieties like radish and arugula hydroponically for cleaner harvesting
- Grow sunflower, pea shoots, and other robust varieties in soil for better flavor and yield
- Use biodegradable grow mats with a thin layer of soil for a middle-ground approach
- Experiment with both methods to find what works best in your specific environment
Remember that growing microgreens is an iterative process. Whichever method you choose initially, you can always adapt and refine your approach as you gain experience. Many growers find value in experimenting with both methods to determine what works best for their specific varieties, space constraints, and end goals.
Frequently Asked Questions
Common questions about hydroponic and soil-based microgreens growing methods.
Are microgreens better in soil or hydroponics?
Research shows that soil-grown microgreens generally have higher nutritional content and more developed flavor profiles. Studies indicate they contain 15-40% more minerals and phytonutrients compared to hydroponically-grown counterparts. However, hydroponic microgreens offer advantages in cleanliness, consistency, and convenience. The “better” method depends on your priorities—for maximum nutrition and flavor, soil has the edge; for cleanliness and convenience, hydroponics may be preferable.
What are the disadvantages of growing microgreens hydroponically?
The main disadvantages of hydroponic microgreens include higher initial setup costs, more technical knowledge required for system maintenance, potentially lower nutrient content compared to soil-grown varieties, lower overall yields in many cases, and increased dependency on external nutrient solutions. Hydroponic systems also tend to be more energy-intensive and may use non-biodegradable growing materials, raising environmental concerns for some growers.
Can you reuse the soil after growing microgreens?
Yes, soil can be reused after growing microgreens, but with some precautions. For home growers, adding spent microgreen soil to a compost bin allows it to rejuvenate before reuse. Some growers mix used soil with fresh soil or compost at a 50:50 ratio for subsequent crops. However, commercial operations typically avoid reusing soil due to food safety regulations and potential pathogen buildup. If reusing soil, it’s best to rotate crop varieties to reduce disease risk and consider sterilizing the soil for commercial applications.
Which microgreens grow better in soil vs. hydroponics?
Certain microgreen varieties perform notably better in specific growing systems. Larger-seeded varieties like sunflower, pea shoots, buckwheat, and beet typically yield better results in soil due to their more extensive root systems and higher nutrient requirements. These varieties often struggle to reach their full potential in hydroponic systems. Conversely, smaller-seeded varieties like radish, broccoli, arugula, and mustard adapt well to hydroponic growing and benefit from the cleaner harvesting process. Cilantro and basil can be successful in both systems but generally develop stronger aromatics when grown in soil.
What growing medium is best for microgreens?
The best growing medium depends on your specific goals. For soil-based methods, a fine-textured seed-starting mix or potting soil with 10-20% added compost or worm castings works well. Many growers prefer organic options that are peat-reduced or peat-free for environmental reasons. For hydroponic systems, hemp mats, coconut coir, and specialized hydroponic grow pads are popular choices. Each offers different benefits: hemp mats are biodegradable and water-retentive; coconut coir is renewable and has good water-holding capacity; while synthetic grow pads are reusable and provide consistent results. For beginners, a high-quality seed-starting mix offers the most forgiving growing experience.
Do hydroponic microgreens need nutrients?
For most microgreen varieties with their short growth cycle (7-14 days), additional nutrients are not strictly necessary in hydroponic systems. The seed itself contains enough nutrients to support the plant through the microgreen stage. However, some growers do use very dilute nutrient solutions (about 1/4 to 1/8 the strength of regular hydroponic nutrients) to potentially enhance growth, especially for varieties with longer growth cycles or when growing past the first true leaf stage. If using nutrients, it’s important to use solutions specifically formulated for edible plants and to follow proper dilution guidelines to avoid nutrient burn or contamination issues.
What are the most nutritious microgreens to grow at home?
The most nutritionally dense microgreens include red cabbage, which offers the highest levels of vitamin C and antioxidants; broccoli, containing significant amounts of sulforaphane (a cancer-fighting compound); kale, rich in vitamins A, C, and K; radish, high in antioxidants and vitamin E; sunflower, packed with protein, zinc, and potassium; and pea shoots, containing high levels of folate and vitamin C. Growing these varieties in nutrient-rich soil rather than hydroponically tends to maximize their nutritional potential. For the most comprehensive nutritional profile, consider growing and consuming a diverse mix of microgreen varieties rather than focusing on just one type.
Conclusion: Finding Your Ideal Microgreens Growing Method
After examining the comprehensive pros and cons of both hydroponic and soil-based microgreens growing methods, it’s clear that there’s no one-size-fits-all answer. Each approach offers distinct advantages and challenges that must be weighed against your specific goals, resources, and circumstances.
Soil-based systems generally produce more nutrient-dense microgreens with enhanced flavor profiles and require less technical knowledge to get started. They’re ideal for beginners, home growers focused on nutrition, and those aligned with organic growing practices.
Hydroponic systems offer cleaner harvesting, more precise control, and greater space efficiency, making them attractive for indoor growers with limited space and commercial operations prioritizing consistency and scalability.
The good news is that both methods are accessible to beginners and can produce delicious, nutritious microgreens with relatively minimal investment. Many successful growers ultimately adopt a hybrid approach, selecting the most appropriate method for each specific microgreen variety they grow.
Whichever path you choose, growing your own microgreens puts fresh, nutrient-dense food at your fingertips year-round. The most important step is simply to begin, experiment, and discover what works best in your unique growing environment.
Ready to Get Started?
Whether you decide on hydroponic or soil-based growing, the key is to begin with quality seeds and basic supplies. Start small with one or two varieties that interest you, follow the step-by-step guides in this article, and adjust your approach based on your results and preferences.
Remember that microgreens are one of the most forgiving and rewarding crops for beginners. Within just 1-2 weeks, you’ll be harvesting your own nutrient-packed greens and gaining valuable growing experience with each cycle.


