Beet microgreens are taking the health and culinary world by storm, and for good reason. These tiny powerhouses pack an incredible nutritional punch that puts their mature counterparts to shame. With their striking burgundy stems and vibrant green leaves, beet microgreens aren’t just beautiful – they’re a testament to nature’s ability to concentrate nutrients into compact, delicious packages.
Whether you’re a seasoned gardener looking to expand your growing repertoire or a health-conscious individual seeking to boost your nutrition naturally, this comprehensive guide will walk you through everything you need to know about beet microgreens. From selecting the best organic seeds to harvesting your first crop, we’ve got you covered with practical, tested advice that actually works.
Quick Success Tip
Did you know that beet microgreens contain up to 333% of your daily vitamin K needs? That’s over 10 times more than mature beets! This makes them one of the most nutrient-dense foods you can grow at home.
What Are Beet Microgreens?
Beet microgreens are young beetroot plants harvested just days after germination, typically between 10-20 days from planting. Unlike sprouts that are grown in water, these nutrient-dense greens are cultivated in soil or growing medium and harvested when they develop their first true leaves.
The most popular variety for microgreen production is Bull’s Blood beet, known for its intense burgundy-red stems and deep green leaves with red veining. This heirloom variety was specifically selected for its exceptional color and concentrated nutrients.
What sets beet microgreens apart from other microgreens is their unique appearance and flavor profile. They taste like a perfect cross between spinach and mature beets – earthy, slightly sweet, with a satisfying crunch that adds texture to any dish.
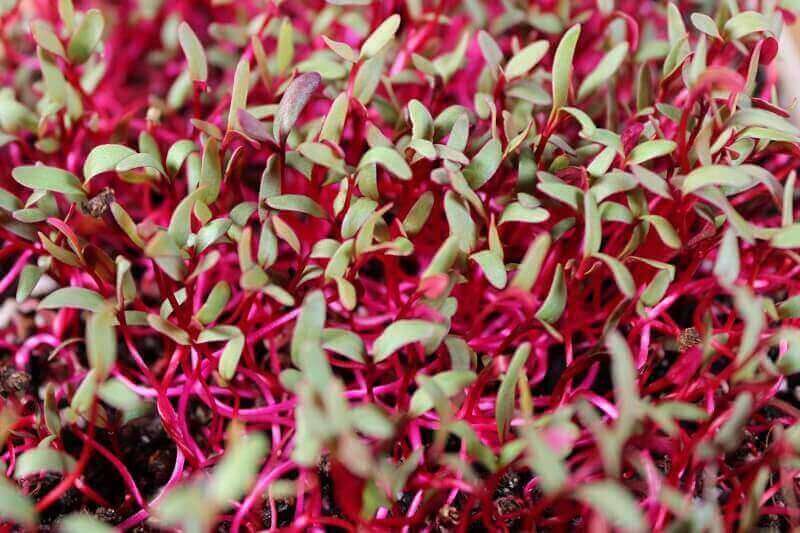
Growth Stage
Harvested 10-20 days after planting with cotyledons and first true leaves
Appearance
Burgundy-red stems with vibrant green leaves and red veining
Flavor
Earthy, slightly sweet, with a mild beet taste and satisfying crunch
Amazing Health Benefits of Beet Microgreens
Beet microgreens are nutritional powerhouses that deliver incredible health benefits in a tiny package. Scientific research shows that microgreens can contain up to 40 times more nutrients than their mature counterparts, making them one of the most efficient ways to boost your daily nutrition.
Nutrition Facts (per 100g)
| Vitamin K | 333% DV |
| Vitamin A | 35% DV |
| Vitamin C | 33% DV |
| Folate | 25% DV |
| Iron | 20% DV |
| Potassium | 15% DV |
Key Health Benefits
- Bone Health: Exceptional vitamin K content supports bone density and prevents osteoporosis
- Heart Health: High potassium and nitrates support cardiovascular function
- Immune Support: Vitamin C and antioxidants boost immune system strength
- Blood Health: Iron and folate support healthy red blood cell production
- Eye Health: Beta-carotene and vitamin A protect vision
Scientific Research
A comprehensive study published in the Journal of Agricultural and Food Chemistry found that red beet microgreens contained over 10 times more selenium than mature red beets, and 3.1 times more chromium.
These microgreens were also particularly rich in organic acids, especially citric acid, and flavonoids that support powerful antioxidant activity throughout the body.
Best Beet Microgreens Varieties to Grow
While you can grow microgreens from any beet variety, certain types have been specifically selected for their superior performance as microgreens. Here are the top varieties that deliver the best flavor, color, and nutritional benefits.
Bull’s Blood Beet
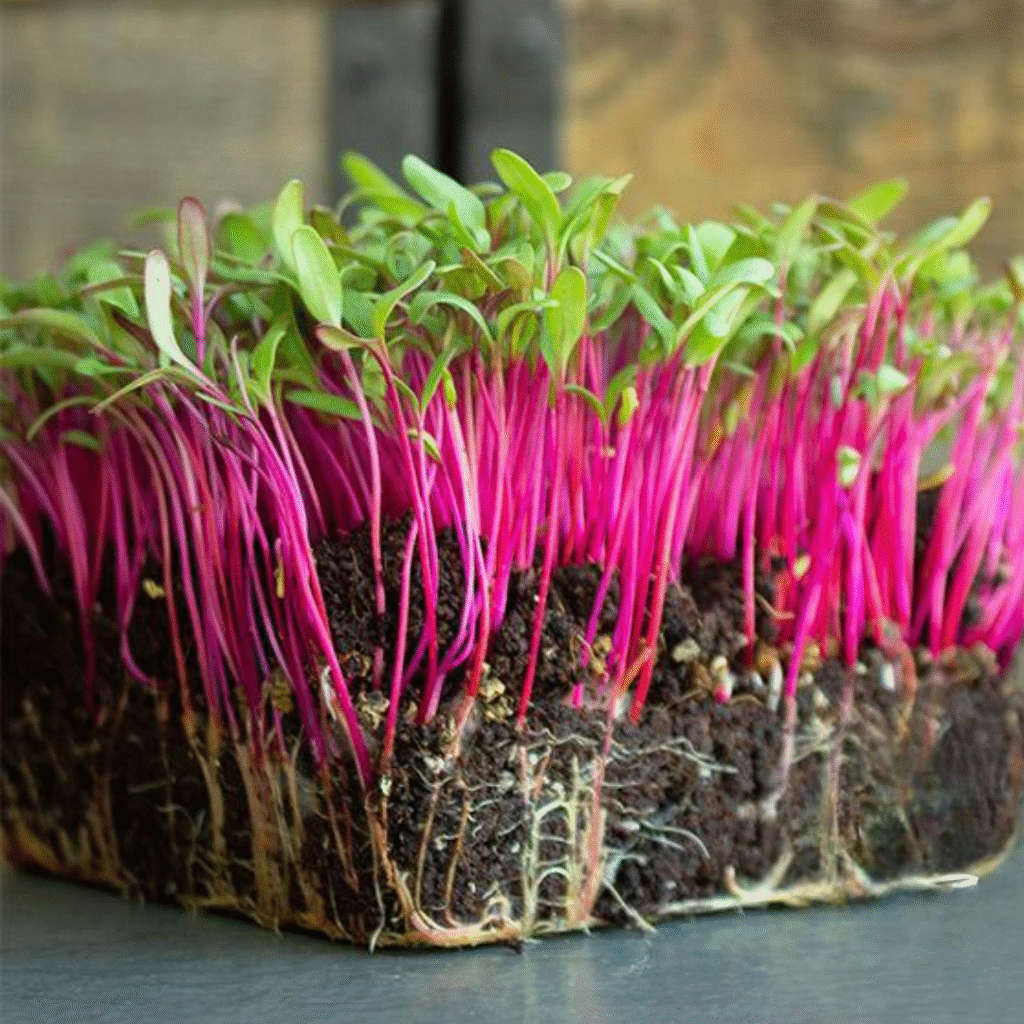
The gold standard for beet microgreens. Deep burgundy stems with intense red coloring throughout. Selected specifically for microgreen production.
Days to harvest: 12-18 days
Flavor: Earthy, sweet, mild beet taste
Best for: Beginners, visual appeal
Detroit Dark Red
A classic heirloom variety dating back to 1892. Reliable germination and consistent deep red coloring. Perfect for organic growing.
Days to harvest: 14-20 days
Flavor: Traditional beet flavor, slightly stronger
Best for: Organic gardens, reliable crops
Touchstone Gold
Unique golden-yellow stems provide beautiful color contrast. Milder flavor than red varieties, perfect for those new to beet taste.
Days to harvest: 15-21 days
Flavor: Mild, sweet, less earthy
Best for: Color variety, mild taste preferences
Chioggia Beet
Known for candy-striped roots when mature, these microgreens offer subtle color variations and excellent flavor profile.
Days to harvest: 14-19 days
Flavor: Sweet, mild, complex
Best for: Gourmet applications, unique appearance
Early Wonder
Selected by professional chefs for bright pink stems and mild flavor. Fast-growing with excellent germination rates.
Days to harvest: 10-16 days
Flavor: Very mild, chef-preferred
Best for: Quick harvests, restaurant quality
Gourmet Blend
A carefully curated mix of heirloom red and gold beets creating a rainbow of colors in your harvest tray.
Days to harvest: 12-20 days
Flavor: Varied, complex flavor profile
Best for: Visual impact, varied taste experience
Seed Selection Tips
Always choose organic, non-GMO seeds from reputable suppliers. Look for seeds specifically labeled for microgreen production, as they typically have higher germination rates.
Pro tip: Bull’s Blood beet seeds are the most reliable for beginners, offering consistent results and spectacular visual appeal that makes your microgreens look professional.
Complete Step-by-Step Growing Guide
Growing beet microgreens is surprisingly simple once you understand the key principles. This detailed guide will walk you through each step, from seed selection to harvest, ensuring your success even if you’re a complete beginner.
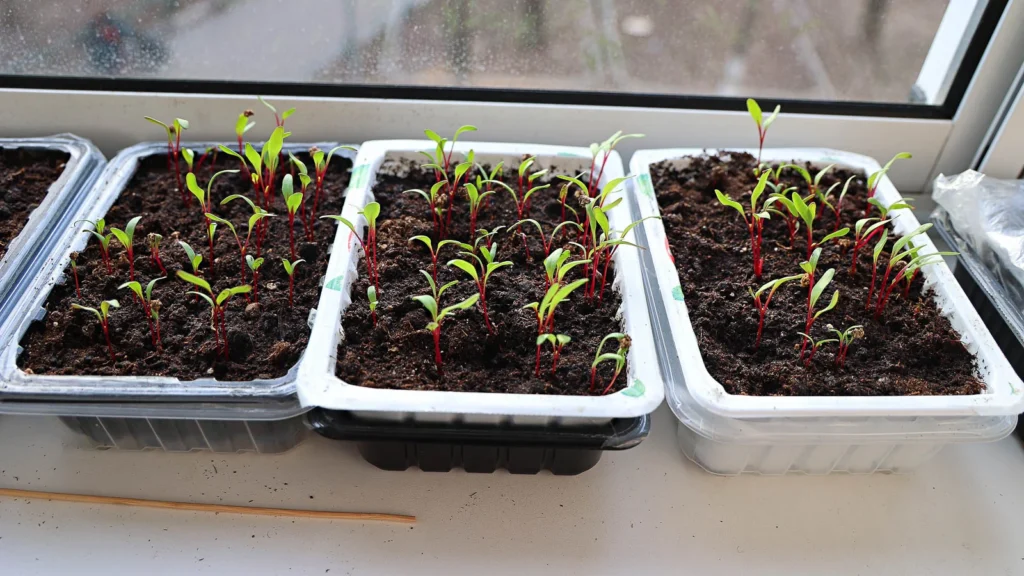
What You’ll Need
Essential Supplies
- Organic beet microgreens seeds (5-6g per 10″x20″ tray)
- Seed starting soil mix (fine texture preferred)
- Growing trays with drainage holes
- Watering trays (without holes)
- Grow lights or sunny windowsill
Additional Tools
- Spray bottle for misting
- Weight (books or dedicated weights)
- Sharp scissors or knife for harvesting
- Filtered water (chlorine-free preferred)
- Room temperature 65-75°F (18-24°C)
1. Prepare Your Growing Medium
Fill your growing tray with organic seed starting mix to about ¾ full. The soil should be level and slightly below the tray rim. Use your hands to gently compact and smooth the surface – beet microgreens need a flat, even surface for optimal germination.
Lightly mist the soil surface with filtered water until evenly moist but not waterlogged. The soil should feel like a wrung-out sponge – damp but not dripping.
Pro Tip: Avoid coconut coir or hydroponic mats for beet microgreens – they prefer the fine texture and nutrients of quality potting soil.
2. Calculate and Prepare Seeds
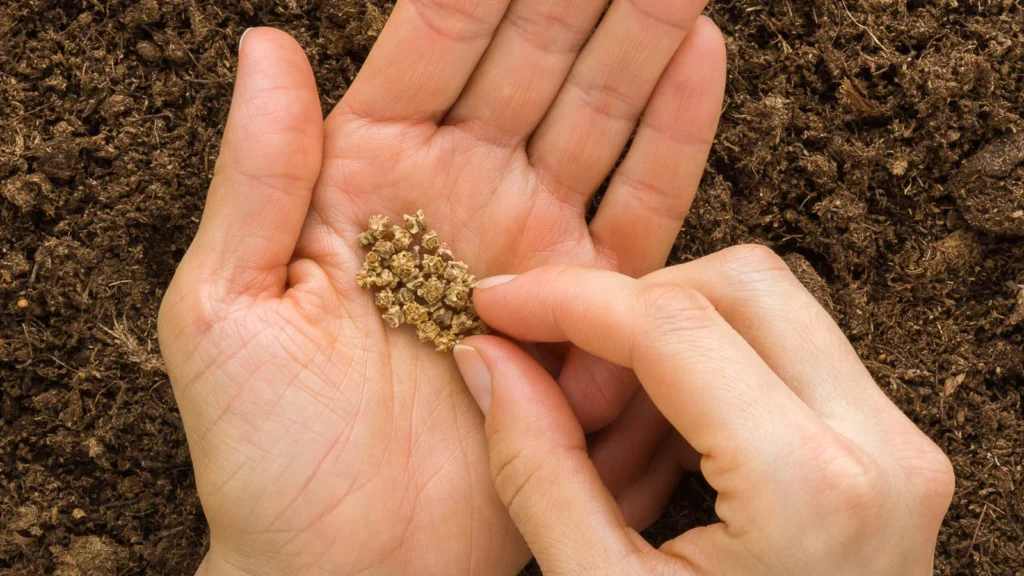
For a standard 10″x20″ tray, you’ll need approximately 5-6 grams of beet seeds (about 1 tablespoon). This provides the optimal density of 9-10 seeds per square inch for healthy growth without overcrowding.
Soaking seeds is optional for beet microgreens. While some growers soak for 8-12 hours, research shows it doesn’t significantly improve germination rates. Fresh, high-quality seeds will germinate excellently without soaking.
3. Sow the Seeds
Evenly distribute the beet microgreens seeds across the soil surface. Use a shaker bottle for the most even distribution, working in concentric circles from the outside in. The large, irregular shape of beet seeds makes them easy to see and adjust.
Don’t worry about perfect spacing – aim for even coverage with minimal gaps. Gently press the seeds into the soil surface with your palm to ensure good seed-to-soil contact.
Give the seeded tray a final light misting to settle the seeds and ensure they’re properly moistened for germination.
4. Create Blackout Conditions
Place your seeded tray inside a watering tray (without drainage holes). Cover with another tray or lid, then add a weight on top. This weighted blackout period is crucial for beet microgreens – it encourages strong root development and prevents leggy growth.
Keep covered for 5-6 days, even after germination begins around day 3. Beet microgreens benefit from extended darkness to develop their characteristic sturdy stems and vibrant coloring.
Important: Don’t peek too often! Consistent darkness during this phase is key to strong, upright growth.
5. Transition to Light
On day 5-6, check your beet microgreens. They should be 1-2 inches tall with pale stems and small leaves. Remove the weight and cover, then place under grow lights or in a bright location.
Don’t be alarmed if they look pale or bent – this is normal! Within 24-48 hours under light, they’ll green up beautifully and straighten out. Provide 12-16 hours of light daily for optimal growth.
6. Water Management
Switch to bottom watering only once under lights. Add about ¼ inch of water to your watering tray and place the growing tray inside. The soil will absorb water from below, keeping the leaves dry and preventing disease.
Water every 2-3 days or when the tray feels noticeably lighter. Never let the soil completely dry out, but avoid overwatering which can cause root rot.
7. Growth Monitoring
Day 7
1-2 inches
Cotyledons developing
Day 12
2-3 inches
Full color development
Day 15-18
3-4 inches
Ready to harvest
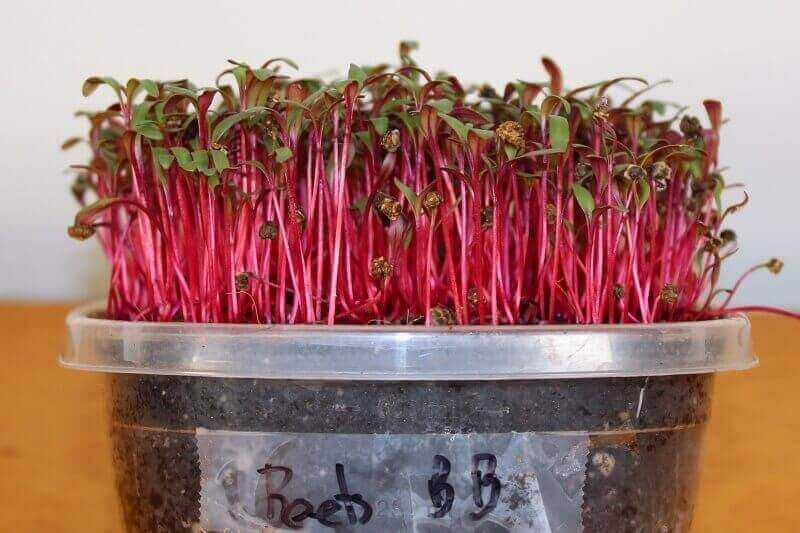
8. Harvest Time
Beet microgreens are ready to harvest in 12-20 days when they reach 3-4 inches tall. The best time is when the cotyledons are fully developed but before the first true leaves become large and tough.
Using sharp scissors, cut the stems just above the soil line. Hold the tray at a 45-degree angle over a cutting board to catch any soil that might fall.
Harvest Tip: Cut only what you need and let the rest continue growing for a few more days. However, don’t wait too long after the first true leaves appear, as the stems will become tougher.
Troubleshooting Common Issues
Even with careful attention, you might encounter some challenges when growing beet microgreens. Here are the most common issues and their solutions, based on real growing experience.
Problem: Poor Germination Rate
Possible Causes:
- Old or poor-quality seeds
- Soil too dry or too wet
- Temperature too hot or cold
- Insufficient seed-to-soil contact
Solutions:
- Use fresh, high-quality organic seeds
- Maintain consistent moisture (not soggy)
- Keep temperature between 65-75°F
- Gently press seeds into soil surface
Problem: Seed Hulls Stuck on Leaves
Why This Happens:
- Beet seeds have thick, tough hulls
- Low humidity during germination
- Insufficient initial moisture
Solutions:
- Increase humidity with dome cover
- Remove hulls by hand (don’t eat them!)
- Ensure adequate initial misting
- Gentle brush with palm to dislodge
Problem: Leggy, Weak Growth
Common Causes:
- Insufficient light intensity
- Light too far from plants
- Removed from blackout too early
- Overcrowding from too many seeds
Solutions:
- Use stronger grow lights or move closer
- Ensure 12-16 hours daily light
- Keep blackout for full 5-6 days
- Reduce seeding density next time
Problem: Damping Off Disease
Signs & Causes:
- Stems collapsing at soil line
- Fuzzy mold growth on soil
- Overwatering or poor drainage
- High humidity with poor air circulation
Prevention & Treatment:
- Always use bottom watering
- Ensure proper drainage holes
- Improve air circulation
- Use sterile growing medium
Problem: Pale or Yellow Leaves
Typical Reasons:
- Insufficient light exposure
- Nutrient deficiency in soil
- Natural transition from blackout
- Overwatering preventing root function
Quick Fixes:
- Increase light intensity/duration
- Use quality seed-starting soil
- Allow 24-48 hours to green up
- Adjust watering schedule
Prevention is Key
Most problems with beet microgreens can be prevented by maintaining consistent conditions: proper moisture, adequate light, good air circulation, and quality materials. Start with high-quality organic seeds and sterile growing medium for the best results.
Harvesting & Storage Guide
Proper harvesting and storage techniques can extend the life of your beet microgreens and maintain their nutritional value. Here’s everything you need to know to get the most from your homegrown microgreens.
Perfect Harvest Timing
- Optimal size: 3-4 inches tall with fully opened cotyledons
- Best timing: Before first true leaves become large and tough
- Color indicator: Vibrant burgundy stems with bright green leaves
- Texture test: Stems should be crisp and juicy, not tough or woody
Harvest Window
Beet microgreens have a flexible harvest window of 3-5 days. You can harvest as needed, but don’t wait too long after true leaves appear as the texture becomes tougher.
Harvesting Technique
- Use sharp, clean scissors or a knife to prevent crushing the delicate stems
- Cut stems about ¼ inch above the soil line to avoid soil contamination
- Harvest over a cutting board or large plate to catch falling soil
- Gently fluff cut microgreens to remove any clinging soil particles
Storage Methods & Shelf Life
| Storage Method | Shelf Life | Best For | Instructions |
|---|---|---|---|
| Refrigerator (Fresh) | 5-7 days | Immediate use | Store dry in perforated bag in crisper drawer |
| Airtight Container | 7-10 days | Longer storage | Place dry with paper towel, seal tightly |
| Freezing | 3-6 months | Smoothies, cooking | Flash freeze on tray, then bag |
| Living Tray | 3-5 extra days | Cut as needed | Keep growing, harvest portions |
Storage Tips
- Never wash before storing – moisture reduces shelf life
- Store completely dry with paper towel to absorb excess moisture
- Keep refrigerated at 35-40°F for maximum freshness
- Use perforated bags to allow air circulation
- Remove any wilted pieces to prevent spoilage spread
Important Notes
- Always remove tough seed hulls before eating
- Wash just before use, not before storage
- Beet microgreens may stain – handle carefully
- Check stored greens daily and remove any spoiled portions
- Fresh is always best – use within a week when possible
Delicious Recipes & Culinary Uses
Beet microgreens are incredibly versatile in the kitchen, offering both nutritional benefits and stunning visual appeal. Their earthy, slightly sweet flavor pairs beautifully with a wide range of ingredients, making them perfect for both simple additions and gourmet creations.

Flavor Profile & Characteristics
Taste: Earthy, sweet, mild beet flavor
Texture: Crisp, juicy, tender
Color: Burgundy stems, bright green leaves
Intensity: Mild to moderate, not overpowering
Culinary Note
Beet microgreens can “bleed” their beautiful red color into dishes, especially when cut or dressed. This natural color transfer can create stunning visual effects in your cooking!
Perfect Pairings
| Proteins | Flavors |
| Goat cheese | Lemon |
| Burrata | Garlic |
| Eggs | Walnuts |
| Salmon | Balsamic |
| Chicken | Honey |
Beet Microgreens & Burrata Salad
Ingredients:
- 2 cups fresh beet microgreens
- 8 oz burrata cheese
- 2 medium roasted beets, sliced
- 1/4 cup toasted walnuts
- 2 tbsp balsamic glaze
- 2 tbsp extra virgin olive oil
- Sea salt and black pepper
Instructions:
- Arrange roasted beet slices on plate
- Tear burrata into pieces, distribute
- Top with fresh beet microgreens
- Sprinkle toasted walnuts
- Drizzle with olive oil and balsamic glaze
- Season with salt and pepper
Serves: 4 as appetizer | Prep time: 15 minutes
Colorful Microgreens Scrambled Eggs
Ingredients:
- 6 large eggs
- 1 cup beet microgreens
- 2 tbsp butter
- 1/4 cup cream cheese
- 1 clove garlic, minced
- Salt and pepper to taste
Instructions:
- Beat eggs with salt and pepper
- Melt butter in non-stick pan
- Add garlic, cook 30 seconds
- Pour in eggs, scramble gently
- Add cream cheese when almost set
- Fold in beet microgreens just before serving
Serves: 2-3 | Cook time: 8 minutes
Avocado Toast with Beet Microgreens
Ingredients:
- 4 slices artisan bread, toasted
- 2 large ripe avocados
- 1 cup beet microgreens
- 1 lemon, juiced
- 2 tbsp pumpkin seeds
- Flaky sea salt
- Red pepper flakes
Instructions:
- Mash avocados with lemon juice
- Season with salt and pepper
- Spread on toasted bread
- Top generously with beet microgreens
- Sprinkle pumpkin seeds
- Finish with flaky salt and red pepper flakes
Quick Usage Ideas
Raw Applications
- Salad toppings
- Sandwich layers
- Smoothie bowls
- Garnish for soups
- Pizza toppings
Cooked Uses
- Stir-fry additions
- Omelet fillings
- Pasta dishes
- Grain bowls
- Sautéed sides
Creative Options
- Microgreens pesto
- Infused oils
- Colorful butter
- Frozen in ice cubes
- Dehydrated chips
Chef’s Tips
- Add beet microgreens to dishes just before serving to maintain their crisp texture
- The natural “bleeding” of color can be used as a natural food coloring
- Store dressed salads separately from microgreens to prevent wilting
- Pair with acidic ingredients like lemon or vinegar to brighten the earthy flavor
- Use as a garnish for both sweet and savory dishes
Beet Microgreens vs. Mature Beets: Nutritional Comparison
One of the most remarkable aspects of beet microgreens is their incredible nutritional density compared to mature beets. Scientific research has revealed some surprising differences that make microgreens a nutritional powerhouse.

| Nutrient | Beet Microgreens | Mature Beets | Difference |
|---|---|---|---|
| Vitamin K | 400 μg/100g | 0.2 μg/100g | 2000x higher |
| Vitamin C | 30 mg/100g | 4.9 mg/100g | 6x higher |
| Selenium | 15.2 μg/100g | 1.5 μg/100g | 10x higher |
| Folate | 120 μg/100g | 109 μg/100g | 10% higher |
| Chromium | 9.3 μg/100g | 3.0 μg/100g | 3x higher |
| Beta-carotene | 4200 μg/100g | 20 μg/100g | 210x higher |
Microgreens Advantages
- Exceptional nutrient density: Up to 40x more concentrated nutrition
- Higher antioxidant activity: More phenolic compounds and flavonoids
- Better mineral absorption: Smaller particles, easier digestion
- Year-round availability: Grow fresh any season indoors
- No oxalates: Lower levels than mature beets
- Quick results: Harvest in 2-3 weeks vs. 2-3 months
Mature Beets Advantages
- Higher natural sugars: More energy per serving
- More fiber: Better for digestive health
- Betalains concentration: Natural pigments with anti-inflammatory properties
- Bulk nutrition: More calories and macronutrients per serving
- Traditional uses: Established culinary applications
- Storage longevity: Last months when properly stored
Scientific Research Findings
A comprehensive study published in the Journal of Agricultural and Food Chemistry found that red beet microgreens contained significantly higher levels of key nutrients compared to mature beets. The research showed that microgreens are particularly rich in organic acids, especially citric acid, and flavonoids that support powerful antioxidant activity.
Key finding: The study concluded that incorporating microgreens into the diet could be an effective strategy for increasing nutrient intake, particularly for vitamins K, C, and essential minerals like selenium and chromium.
Frequently Asked Questions
Here are the most common questions about growing and using beet microgreens, answered with practical, experience-based advice.
How long do beet microgreens take to grow?
Beet microgreens typically take 12-20 days from planting to harvest. The exact timing depends on the variety, growing conditions, and your preferred harvest size. Bull’s Blood beets are usually ready in 12-15 days, while other varieties may take up to 20 days. They’re ready when they reach 3-4 inches tall with fully developed cotyledons.
Should I soak beet microgreens seeds before planting?
Soaking is optional for beet microgreens seeds. While some growers soak for 8-12 hours, research shows it doesn’t significantly improve germination rates for high-quality seeds. Fresh, viable seeds will germinate excellently without soaking. If you choose to soak, use cool water and don’t exceed 12 hours to prevent seed damage.
Are beet microgreens safe to eat daily?
Yes, beet microgreens are safe to eat daily and are incredibly nutritious. They contain lower levels of oxalates than mature beets, making them easier to digest. However, as with any food, moderation is key. Start with small amounts (1/4 to 1/2 cup) and gradually increase. Their high vitamin K content means people on blood thinners should consult their doctor before consuming large quantities regularly.
What do beet microgreens taste like?
Beet microgreens have a mild, earthy flavor that’s like a cross between spinach and mature beets, but much milder. They’re slightly sweet with a subtle “earthy” note and a satisfying crunch. The flavor is not overpowering, making them perfect for people who find mature beets too strong. The stems are juicy and tender, while the leaves add a fresh, green taste to dishes.
What’s the best temperature for growing beet microgreens?
The optimal temperature range for beet microgreens is 65-75°F (18-24°C). They can tolerate slightly cooler conditions (60°F) but will grow slower. Temperatures above 80°F can cause poor germination and increase the risk of damping-off disease. Consistent temperature is more important than exact numbers – avoid placing trays near heat sources or in drafty areas.
How long do harvested beet microgreens last?
Fresh beet microgreens last 5-7 days in the refrigerator when stored properly. Store them completely dry in a perforated bag or airtight container with a paper towel to absorb excess moisture. Never wash them before storage – only rinse just before use. For longer storage, they can be frozen for up to 6 months, though the texture changes and they’re best used in smoothies or cooked dishes.
Why do seed hulls stick to my beet microgreens?
Seed hulls sticking to beet microgreens is common because beet seeds have particularly thick, tough hulls. This happens more often in low humidity conditions or when seeds aren’t adequately moistened initially. To minimize this: increase humidity during germination with a dome cover, ensure thorough initial watering, and remove hulls by hand before eating (they’re tough and not pleasant to eat).
Still Have Questions?
Growing beet microgreens is a rewarding journey that gets easier with experience. Don’t be afraid to experiment with different varieties, growing conditions, and harvesting times to find what works best for your taste and setup. Every grower develops their own techniques over time!
Start Your Beet Microgreens Journey Today
Beet microgreens represent one of the most rewarding and nutritious crops you can grow at home. With their stunning burgundy stems, incredible health benefits, and surprisingly easy growing requirements, they’re perfect for both beginner and experienced gardeners looking to boost their nutrition naturally.
Key Takeaways
- Exceptional nutrition: Up to 333% daily vitamin K needs in just 100g
- Easy to grow: 12-20 days from seed to harvest
- Versatile use: Perfect for salads, cooking, and garnishing
- Year-round growing: Indoor cultivation any season
- Cost-effective: Grow pounds of microgreens for pennies
Getting Started
- Choose Bull’s Blood beet seeds for your first crop – they’re the most reliable and visually striking
- Gather basic supplies: growing trays, quality soil, grow lights, and seeds
- Follow the step-by-step guide, paying special attention to the 5-6 day blackout period
- Start small with one tray, then expand as you gain confidence and experience
Transform Your Health with Beet Microgreens
Join thousands of home growers who have discovered the incredible benefits of fresh, homegrown beet microgreens. With just 10-15 minutes of daily attention, you can have a continuous supply of these nutritional powerhouses.
“The best time to plant a tree was 20 years ago. The second best time is now.” The same principle applies to beet microgreens – start today and enjoy fresh, nutritious greens in just two weeks!


